
The January 1975 issue of Popular Electronics magazine had a breakthrough project on the cover. The Altair 8800 -- World's First Microcomputer Kit to Rival Commercial Models". (Click on the link to read the original article.)
One thing that struck me about microcomputers back then was how big they were. Big impressive boxes (with big impressive marketing claims) seemed to be the norm -- even when the boxes (and marketing claims) were mostly full of hot air. Conventional wisdom said that they had to be big, due to the limitations of the technology at the time.
But was that really true? We had pocket calculators before the Altair. They are all microcomputers, too. The HP-35 scientific calculator came out 3 years before the Altair, and had considerably more computing power at a lower price. And... it fit in your shirt pocket!
So I got to wondering... Could we have built an 8080 microcomputer, like the famous Altair 8800, but in a pocket-sized package? No "wizard behind the curtain" modern chips to make it work. It had to be built with vintage parts and through-hole techniques; just as it would have been back then. It must be user programmable; not simply running a fixed program like the HP-35. And, it's got to have a real front panel, like the Altair with its classic switches and blinking lights. I set out to try.
I had previously built a reproduction of the August 1976 Popular Electronics "COSMAC Elf microcomputer" in an Altoids tin. I called it the 1802 Membership Card. It used the RCA 1802 microprocessor, which is a natural for battery operation. That project turned out very well. I made it available in kit form, and hundreds have been sold (click the link for details).
But the 8080 was a much harder nut to crack. It isn't quite a complete CPU by itself; it needed several support chips to finish the job. It also needed three supply voltages; +5v, +12v, and -5v. That made it tough to power it from a single-voltage power supply or battery.
I couldn't find a way to pack it all in without "cheating" with modern parts or construction methods. So I backed off, and designed a version of the Membership Card around the Z80 instead. The Z80 is a derivitive of the 8080 (runs the same software) and is much simpler to use hardware-wise. It was successful, so the Z80 Membership Card kit is also available (click the link for details).
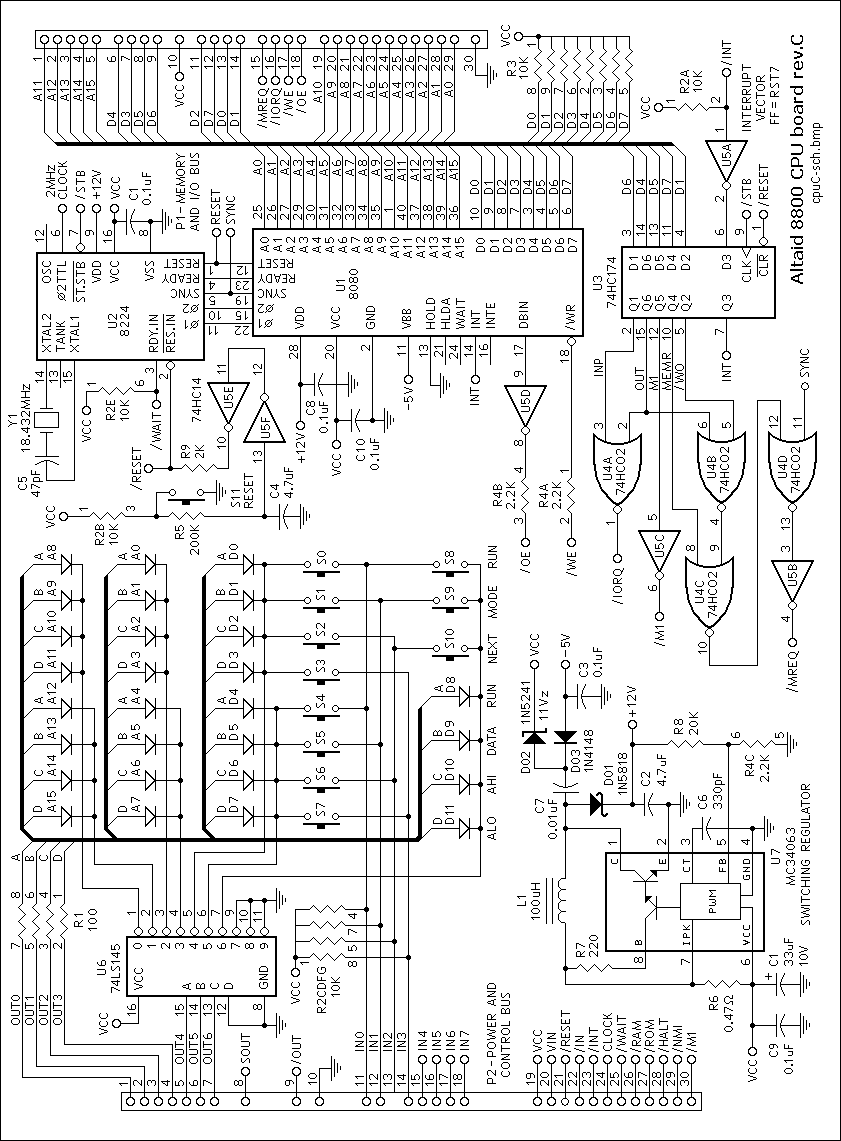
But I kept thinking and "schematicizing". I couldn't fit the 8080, its support circuitry, memory, and I/O onto one Altoid-sized single-board computer (like my 1802 and Z80 versions). It was Josh Bensadon (the guy in the picture above) who provided the "Aha!" idea. He said, "You'll need a second Front Panel board anyway. So put the CPU on the Front Panel, so everyone can see that it's a real 8080. It can be the 'CPU board' as well as the 'Front Panel board'. Put the memory and I/O on the second board."
That worked! The "CPU board" has the 8080, its support chips, and a switchmode power supply to provide the 3 voltages needed. That left room to include the "Front Panel" switches and lights. Borrowing from the Heathkit H8 (another classic 8080 microcomputer from the 1970's), I used software to drive the Front Panel to save parts and improve functionality. I managed to lay it out, and get it built.
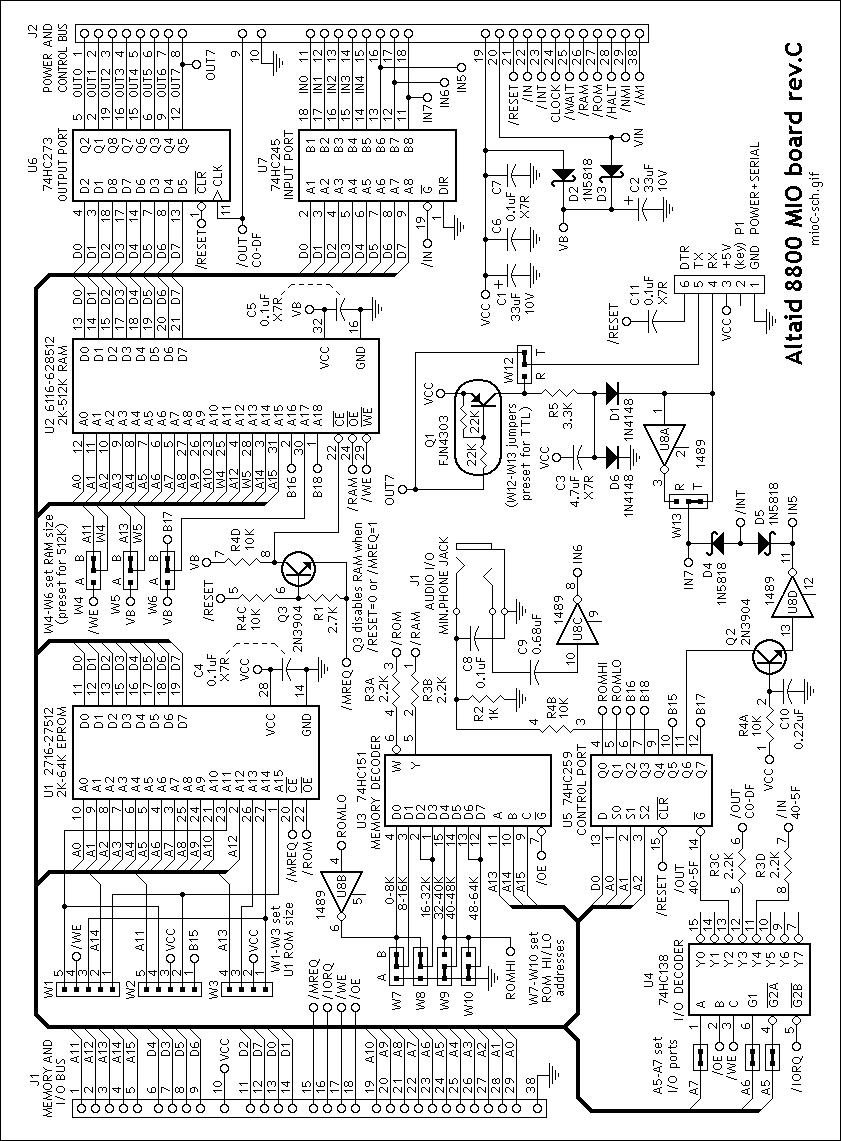
The second board has the memory and I/O. The bus interface between the two is the same as the Z80 Membership Card. Like the old Altair S-100 bus, cards can be interchanged between them, and new cards can be designed that will work with both.


![]()
This card has the rest of the circuitry needed to make a complete working computer like the original Altair 8800. At the time the photo was taken, a few parts still hadn't been installed.
On power-up, the program in ROM (version 0.5) does a brief self-test. Then the Monitor runs, and responds to the Front Panel switches, and commands on the serial input.
The Address LEDs will initially display the "tick" counter address, and the Data LEDs will display the contents of this address. Since the "tick" counter is continuously changing, you'll see the Data LEDs counting up in binary. Changing the address will show the contents of the new selected location.
Front panel operation:
Keys:
8 DATA keys - Press to toggle the respective bit in the Data, High Address, or Low Address.
1 RESET key - Press and hold 2 seconds to reset the 8080.
1 MODE key  - Steps display between High Address, Low Address, Data, and Monitor modes.
              The LEDs flash for the group selected.
1 NEXT key  - Increments the address to the next location.
              Press D7 and then NEXT to decrement address to previous location.
              Hold down NEXT to auto-repeat.
1 RUN key   - Turns on RUN LED and jumps to (executes) program at the current address.

LEDs:
16 - Address LEDs
 8 - Data LEDs
 4 - Mode LEDs (User, Monitor, Disk read, Disk write)
The serial monitor starts up at 9600 baud. To select a different baud rate, press and hold the D4 key for 9600, D5 for 19.2K, D6 for 38.4K, or D7 for 38.4K (the default), then press the RESET key. Commands are:
MENU>       The monitor's prompt, when it is waiting for your input.
B           - set BAUD rate. 1=9600, 2=19.2K, 3=38.4K, 4=38.4K may be faster but miss characters.
C           - go to CP/M.
D xxxx yyyy - Dump memory from address xxxx to address yyyy.
E xxxx      - Edit memory starting at address xxxx.
  xxxx : yy        address xxxx and its contents yy. Press ENTER for next,
  xxxx : yy zz zz  or a new value zz, then ENTER to change it. The value is read and displayed again to confirm the write.
                   Press ESC to exit.
F           - Format RAM disk
K           - Checksum RAM disk
M           - Memory bank select (ROM or banked RAM)
G xxxx      - Go (Execute) program at address xxxx
O xx yy     - Output yy to port xx
I xx        - Input from port xx
R xxxx      - Read Sector xxxx (from 0-0DFF is RAM, 0E00-0E4F is ROM)
W xxxx      - Write Sector xxxx (same range)
X R or S    - XMODEM R=receive, S=send
T           - Toggle timer on/off
L           - Toggle Front Panel on/off
V           - View address and its contents on Front Panel

With a 32k ROM and 512K RAM, the Altaid 8800 runs the CP/M-80 operating system with a 61K TPA and 448K RAM-disk with battery backup. Two standard CP/M transient programs, PIP.COM and XM.COM (XMODEM) are pre-loaded. XMODEM can be used to load or save files or entire disk images from a host computer.
Ready to build your own? Order a complete kit, which comes with both PC boards, all on-board parts, and a detailed manual with parts list and instructions. Or order just the bare PC boards, and put those idle vintage parts in your junk box to good use.
8 May 2022: Hackaday.com ran an article on the Altaid 8800. I was swamped with orders that used up my stock of vintage parts. I had to order more, and some of them are now more expensive, harder to get, and require testing to be sure they're good. A price increase was unfortunately needed to cover the extra cost.
The current CPU and MIO cards are rev.C, so I think we have all the bugs out. If you find any, let us know! The only issue we're aware of is that the disk images for the Z80MC currently won't work (they're the wrong size); but you can download CP/M files from them individually. (We're working on a fix).
Here are the changes to update the previous cards, for developers who have the earlier revisions.
CPU card rev.A fixes:The Altaid 8800 uses RST7 for its hardware interrupts (serial, switches, LEDs, and timer). But CP/M's DDT debugger also uses RST7 for its breakpoint marker. You can't use the same interrupt for both! CP/M's creator provided a patch for DDT (Application Note #07) to use RST6 instead. This is DDT6.COM, which is included in the downloadable Altaid 8800 disk image.
Projects like this are always a work in progress; but this should give you an idea of where we're at. If you look at the Z80 Membership Card, you'll also see where we're going! Feel free to contact us with comments, critiques, or complaints.
By Lee A. Hart. Last update 3/3/2026.
Go to TOP ........
Go to HOME ........
Questions? Comments? Email me for details.
Web hosting provided by my good friend and brilliant computerist Jon "Sheer" Pullen.