The 1802 Membership Card

Once upon a time, microcomputers were simple and easy to understand. So simple in fact that a kid like me, with no computer experience whatsoever, could actually understand them, build them, program them, and put them to work in his very own projects!

The COSMAC 1802 was created in the 1970's at the dawn of the microcomputer revolution, by Joseph Weisbecker of RCA Corporation. It used their new CMOS fabrication process, which had very low power consumption, very high noise immunity, and was very simple to use. It was intended for military and aerospace; applications too tough for other microcomputers to survive.
But Joe was a hacker at heart. He wrote a series of articles starting in the August 1976 issue of Popular Electronics magazine called "Build the COSMAC ELF". It described a simple low-cost computer, using the 1802 microprocessor. At the time, microcomputer systems cost hundreds to thousands of dollars. (Hmm... they still do today!) But Weisbecker's ELF cost about $80! Yet, it was an honest-to-goodness real live computer, able to do anything its much bigger cousins could do -- albeit a bit slower and cruder.
It was the ideal computer trainer. Hobbyists built thousands of ELFs, learning about computer design, construction, and programming in the process. A dozen companies produced versions of the ELF, also selling for low prices. It was the "Legos" of computers; a simple building-block computer that could be assembled many ways to become almost anything, limited only by your imagination.
I learned about computing on my ELF. It put me on a career in engineering, as it did for thousands of others. 1802's got designed into all sorts of amazing things; video games, music synthesizers, auto engine controllers, military weapon systems, and even NASA missions such as the Galileo spacecraft. Eat stardust, PCs and Macs!
Today's computers are far more powerful than the 1802. But they have also become so complicated that virtually no one can build them or truly understand how they work. We depend on someone else to make them for us, and to provide us with the megabytes of pre-written software needed to do anything with them. You can't learn the basics if there is nothing "basic" to learn on! I decided to do something about it.

The Membership Card is a reproduction of the original Popular Electronics Elf computer, repackaged to fit in a pocket-sized Altoids(R) tin. It is entirely built with 1980's parts and technology, using only common low-cost through-hole parts (no custom ICs or surface-mount assembly). To use it, you don't need a modern PC, or megabytes of proprietary software. Now you can learn about computers right from the ground up, and really understand how they work!

There are two circuit boards, each the size of a credit card. One is the Membership Card itself. It has the 1802 microprocessor, up to 64k bytes of memory, 22 bits of I/O, clock, reset, and power supply circuits, plus a supercapacitor to maintain memory contents without power. It can be used by itself as a microcontroller for projects like the Parallax BASIC Stamps or Arduino microcontrollers.
All power, control, input, and output signals are available on the 30-pin header along the bottom. The 6-pin header in the lower right corner provides power and serial I/O connections with a USB-serial adapter (Sparkfun #9718 or equivalent). The photo shows it with the optional 32k memory upgrade installed, with a monitor, BASIC, and Adventureland game.

The second board is the Front Panel. It provides the switches and LEDs for a "blinkin-lights" control panel, just like the classic computers of old. It can read and write to memory and I/O ports manually, without any help from software or external devices. Data is displayed in both individual binary bits and two hexadecimal digits (or even 6-character ASCII messages with 4 optional extra digits and appropriate software).
A USB-serial adapter (Sparkfun #9718 or equivalent) plugs directly into the 6-pin header to provide power and serial I/O. Serial I/O allows an external terminal or PC to load, save, and run programs.
The Membership Card can be purchased as a bare board with manual, kits for the individual boards, or as a complete kit with all parts including the CPU card, Front Panel card, and even an empty Altoids tin to put it all in. An optional Cover Card provides a finished cover with holes and labels for all the lights, switches, and connectors.

The Membership Card is your ticket to the fascinating world of microcomputing. Return with us now to those thrilling days of yesteryear, when the heroic pioneers of the microcomputer revolution built their own computers from scratch, and learned to program them to do incredible things, all for a tiny amount of money!
Note: If you order more than one item, Paypal will blindly charge shipping and handling on each one. I will combine the orders, ship them together, and refund the excess via Paypal. Or, use the ORDER FORM to order more than one item.
Hundreds of Membership Cards have been sold. We've developed a few accessories, and our customers have come up with dozens of interesting projects. Now that you have yours, what did YOU do with the 1802? Send me links to your projects, and I'll add them here!

Want to build your own Membership Card from scratch? Or make your own expansion boards that plug right in? The Membership Card Protoboard is just the thing. It's precisely the same size, to fit inside an Altoids case. It stacks on top, or in between the 1802MC and Front Panel cards.
It has a grid of 0.060" pads with 0.040" holes on 0.1" centers to breadboard your circuit, as well as labeled connector locations and mounting holes to match the 1802 Membership Card. This is no cheap phenolic crackerboard; it's a high quality made-in-USA glass-epoxy board with precision plated-through holes. It also comes with a 30-pin male header and matching 30-pin female socket.
Order it with the 1802 bare PC boards "Buy Now" button above, and select the "1802MC protoboard with connectors" drop-down option.
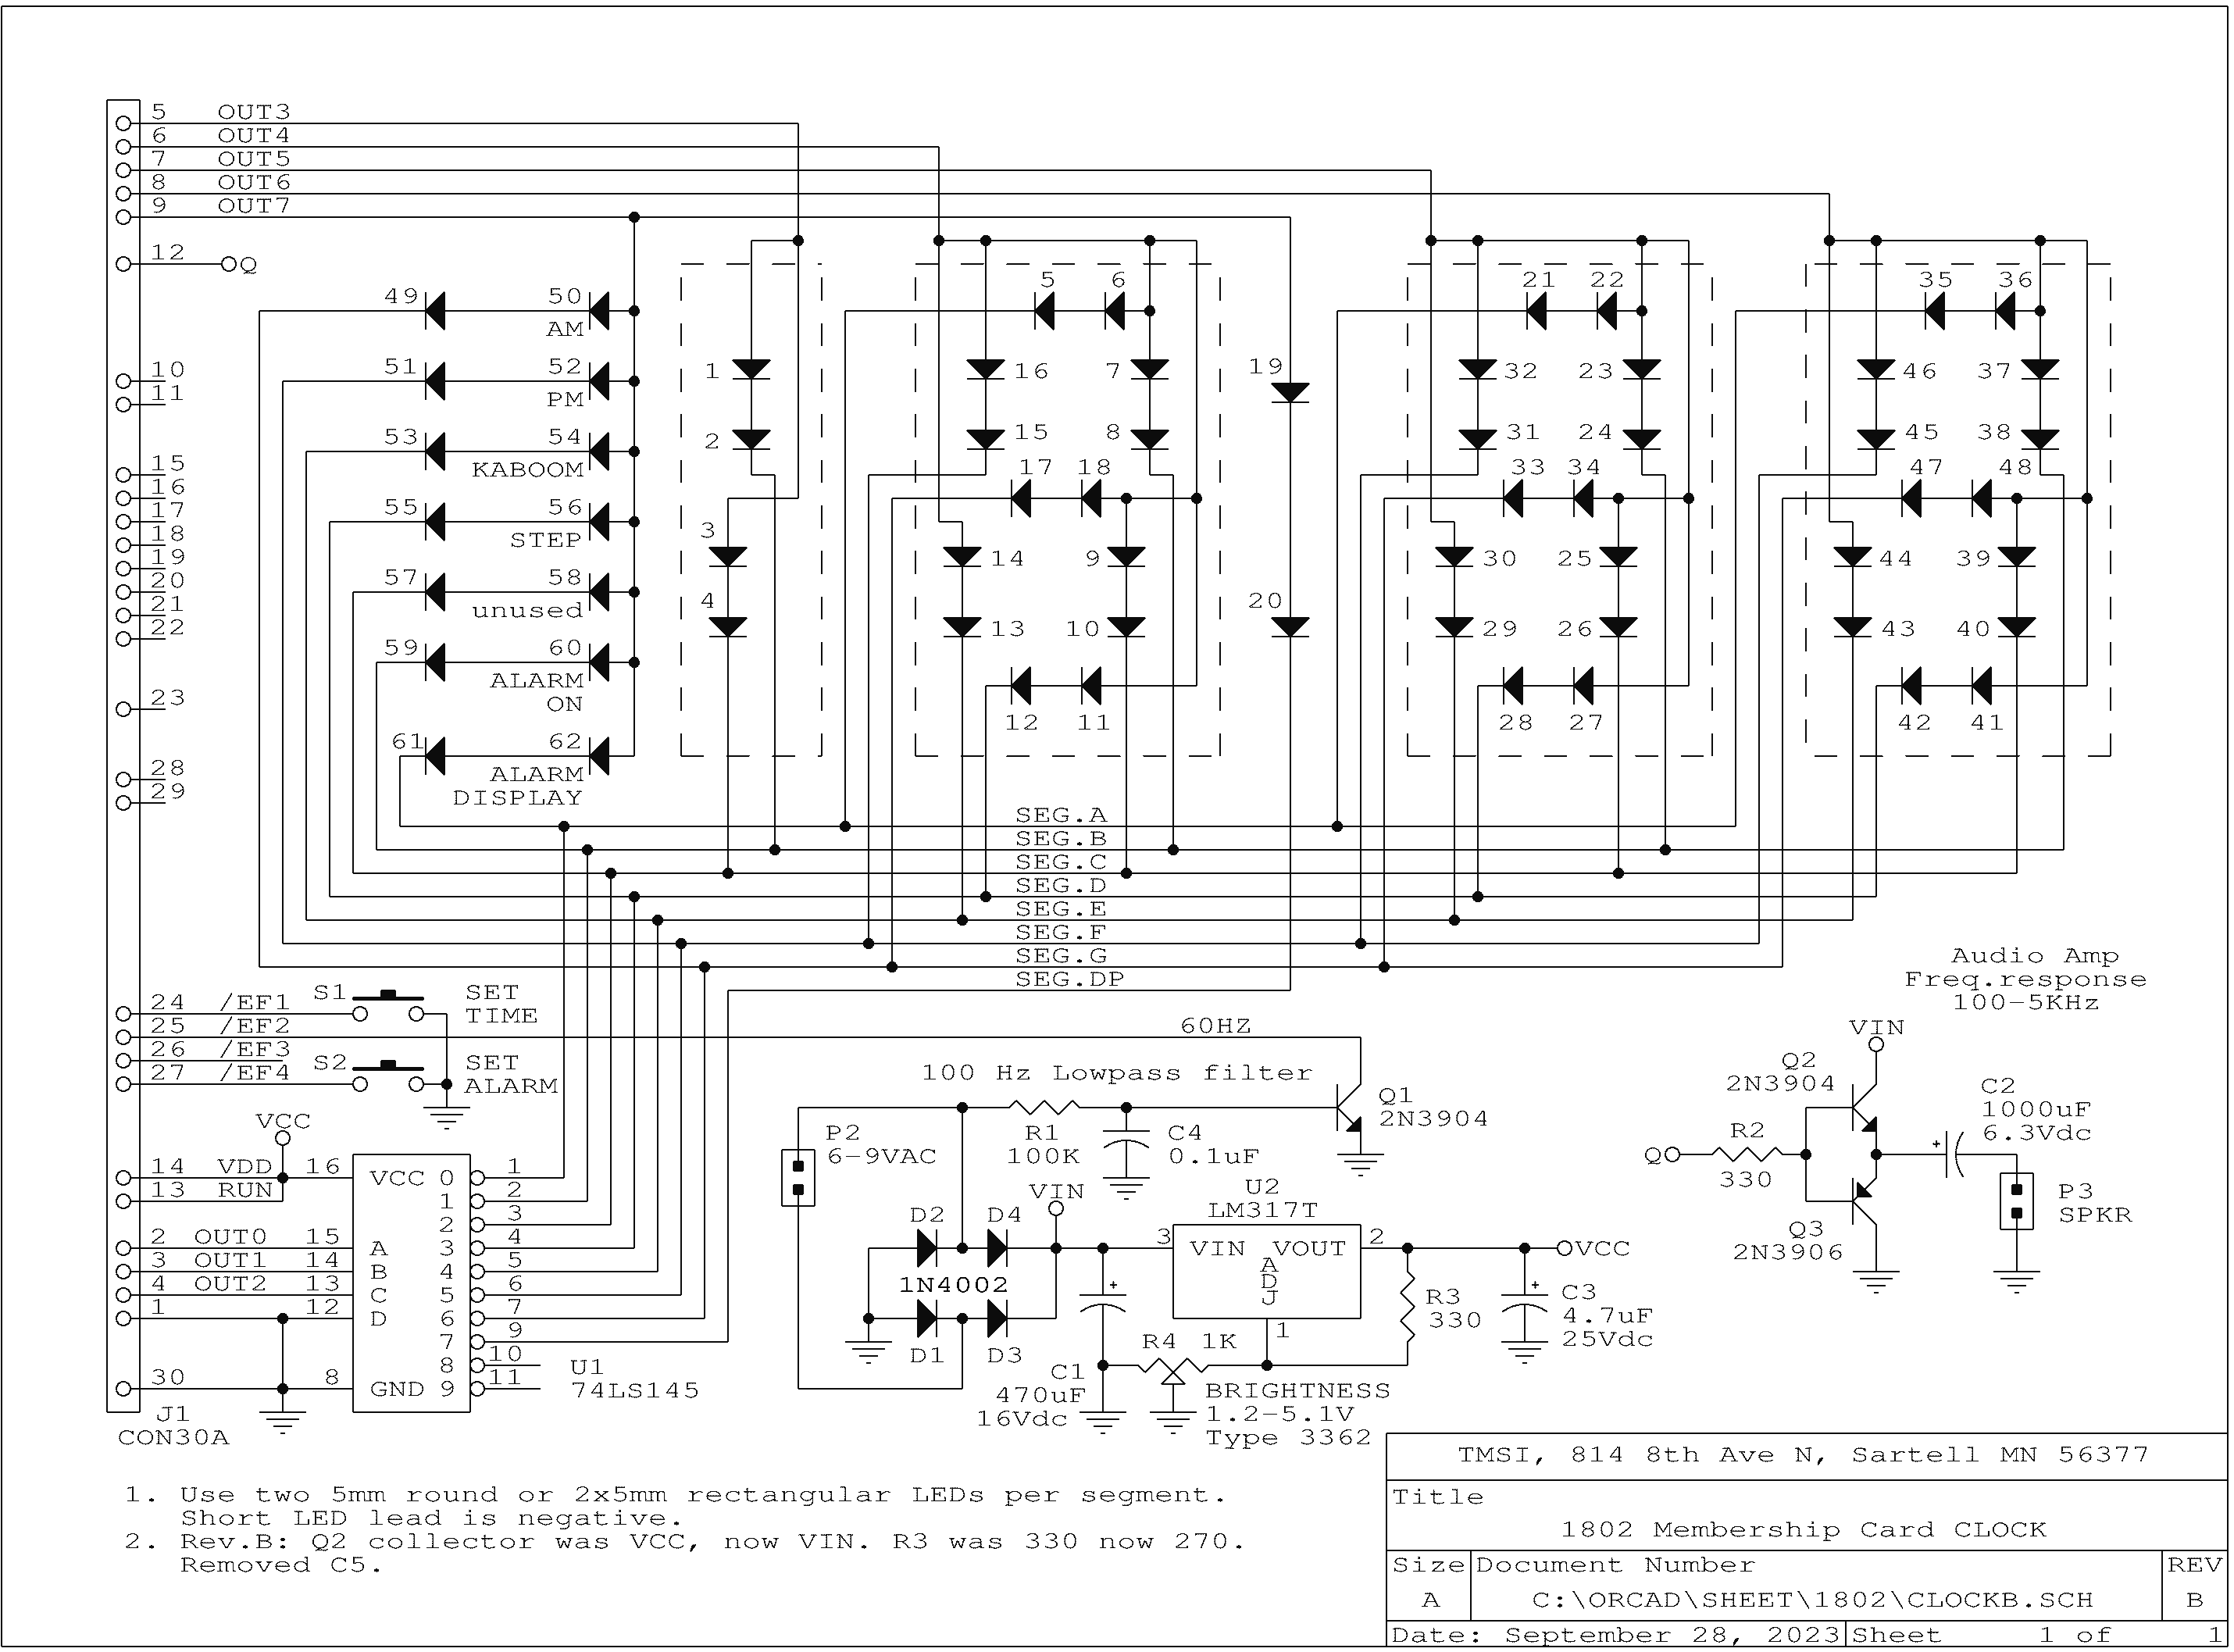
This project started because my son is hard to get out of bed in the morning. So how about an alarm clock that is truly "alarming"? A minute before the alarm time, it starts ticking like approaching footsteps. Louder and louder, closer and closer, until a big KABOOM! explosion sound at the end. The only way to prevent the explosion is to shut it off before the footsteps stop!
The large 4-digit display is made with individual LEDs for a "retro" look. Any color or shape can be used. The kit normally comes with rectangular red LEDs; but ask if you would like me to substitute something else.
This is an accessory card for the 1802 Membership Card. Only the 1802MC CPU card is used; the Front Panel card is not needed. (Order the "1802MC CPU card kit, with manual" separately above). A 9VAC "wall wart" transformer provides both power and a 60 Hz reference to keep accurate time.

Got a Membership Card that's not doing anything? Put it to work! The Elf Clock card will turn it into your very own custom clock. Source code is provided, so you can change the sound effects to a rooster crowing, or anything else you like. Since the Membership card is just a repackaged Elf, it can also work with any other 1802 Elf computer. Additional information:
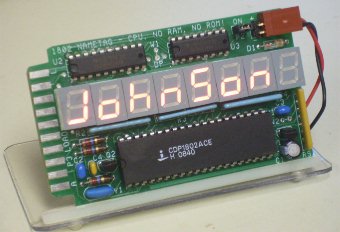
This little project is an 1802 Name Tag. It shows just how much you can do with an 1802 and an absolute minimum of resources! It's the size of a credit card, and runs on just 10ma from three AAA cells (4.5v). That's low enough to run for days. The batteries will also maintain the message for years in standby.
The 1802 scans a multiplexed 8-digit 7-segment LED display to produce four 8-character message "frames", displaying them sequentially about one every second. Every segment in each message is programmable, so it can spell out text as well as numbers.It uses an 1802, a 74HC241 octal buffer, and a 74HC138 1-of-8 decoder. Astute observers will note that there is no RAM or ROM! Yet, it is running a program and scanning the display. It even uses a 'front panel' for loading messages, which since it is an 1802, is nothing but switches and LEDs.
How can it work? Where is the program? Where is the data? Unique features of the 1802 make this possible. The schematic reveals the secret. The data is stored in the 1802's registers. There are sixteen 16-bit registers (32 bytes), which is enough to hold the four message frames of 8 bytes each.
The program is produced by the unusual configuration of resistors to the data bus from the address bus, power, and ground. Each "fetch" cycle gets an opcode to read a register. Each "execute" cycle displays that register's contents in its associated LED digit. As the program counter increments, each address is one higher, which produces an opcode one larger, to read the next higher register. The program is thus 80h, 81h, 82h... (GLO R0, GLO R1, GLO R2...). This reads and displays the lower byte of each of the 16 registers. At 8Fh (GLO RF) it advances to 90h, 91h, 92h... (which are GHI R0, GHI R1, GHI R2...). This displays the upper byte of each of the 16 registers. Tricky!
But wait; there's more. :-) Address bits A0, A1, and A2 scan the LED digits (with help from the 74HC138 decoder). Address bits A10 and A11 are wired so each 8-instruction sequence repeats 128 times before advancing to the next one. This makes each 8-character frame get displayed for a second before advancing to the next frame.The 74HC241 octal buffer is actually being used as two 4-bit latches. I couldn't use a standard octal latch, because the high address bits need to be latched at TPA, and the low bits at TPB (and saved for the subsequent execute cycle).
This all works; but the LEDs would be dim because they are only active half the time (off during each "fetch", and on during each "execute" cycle). So a simple wait-state generator is added, to make the execute cycles far longer than the fetches. The LEDs are thus active 99% of the time for good brightness.
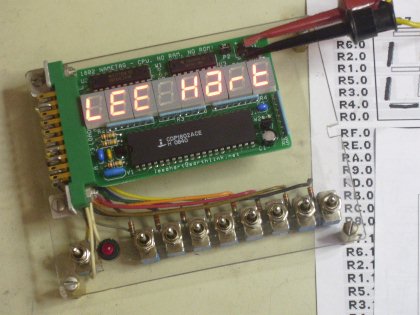
A "Programming Panel" (above) is used to load your messages into the registers. Each register bit maps to one segment in the display, as shown in the segment map at right. Just like an Elf or the Front Panels on computers of old, you toggle in a program in hexadecimal to load the registers like this: F8 data0 A0, F8 data1 A1, F8 data2 A2... These are the instructions LDI data0, PLO R0, LDI data1, PLO R1, LDI data2, PLO R2... Surprisingly, it doesn't use the 1802's LOAD mode. Instead, it uses WAIT to hold the CPU for the next byte. It would probably work with an 1804/5/6 (versions of the 1802 that have no LOAD mode).
This is a great "quickie" project! If you like puzzles, or enjoy trying to figure out how such a "mad" circuit works, click on the schematic link. The manual and segment map for programming it are also available at the links below. Besides the parts on the board, you'll also want to build a programming panel; for this you'll need ten toggle switches, nine resistors, and an LED.
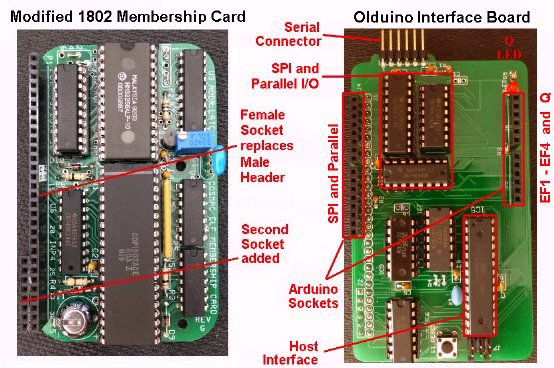
Bill Rowe has been very busy with his Membership Card. He noticed that there were lots of accessory boards (called "shields") for the Arduino microcontrollers. So, he made the Olduino adapter board to plug in and control Arduino shields with a Membership Card!
Since Arduinos are programmed in C, Bill developed an 1802 C compiler to program the Membership Card. He's controlled LCD displays, ethernet adapters, interfaced SD memory cards, and more. Quite an impressive feat! Take a look at Bill's site -- he's put a lot of work into this, and achieved some impressive results. The photo at right shows the Membership Card on the left and Bill's Olduino on the right.
Chuck Bigham didn't have a parallel port on his PC. So he programmed a PICAXE microcontroller as a RS-232 serial-to-parallel converter. He also wrote a Windows program to provide a control panel. The project is documented with schematics and software at RS-232 serial to parallel adapter. Thanks, Chuck! I've always wanted to play with the PICAXE micros, and this gives me an excuse.
Mark Moulding also built a serial loader, but he used an 8051-class microcomputer (the Atmel AT89C2051). It accepts data from an RS-232 port (or USB port with USB-to-serial adapter), and loads it into the Membership Card parallel port. It can accept hex files directly from DOS, coming from an assembler or simple text program. Herb Johnson has collected Mark's work here.
Chuck Yakym's approach was to build a board with a clock, a 4040 counter, and an EPROM. This board can plug into the 25-pin connector on the Front Panel card, or directly onto the Membership Card's 30-pin header (so no Front Panel Card is needed). When you press the "Autoload" button, the clock steps the counter to sequentially address each byte in the EPROM. The outputs from the EPROM go to the INPUT switches. The IN button is pressed for each byte, so it automatically loads the EPROM's contents into RAM, just as if you had set the switches and pressed IN to do it manually.
 |
 |
A plain old Altoids tin is kind of boring, so many people have built their own cases for the 1802MC. Here are two particularly nice ones.
The mini-Altair style case on the left was 3D printed by Sage Hansen. The top cover slides off, to reveal a front compartment for the 1802MC, and a rear compartment large enough for a battery holder, power supply, or other parts and accessories. He has the files on Thingiverse, if you'd like to print one yourself.
The mini Apple-II styled case on the right was 3D printed by Walter Miraglia. The top cover is removable, for access to the rear compartment for batteries or other boards or accessories. He also has his design on Thingiverse.
If you come up with any clever designs, let us know!
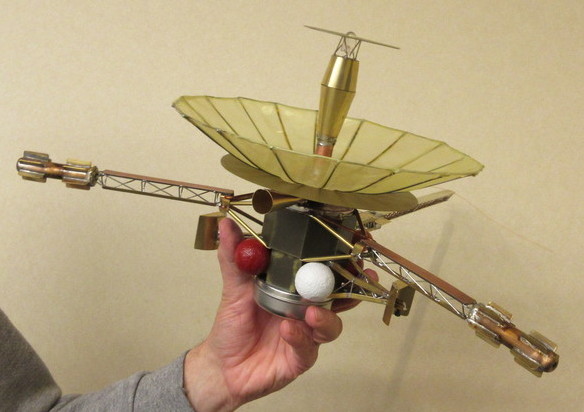
NASA's Galileo mission to Jupiter used six 1802's, so I decided to build a model of it for the VCF-MW show (above). It contains a working 1802 Membership Card, which is sending the Arecibo message in Morse code via a blinking LED (seen at the very top of the model).
The model was built from scratch, based on photos found on the web and a paper model from spacecraftkits.com. It was constructed from pieces of scrap PCB material, copper wire, electronic parts, and bits of brass from a model railroad hobby shop. Befitting the project of an EE, it's all soldered together.
The Membership Card inside is powered by three AAA cells. The program is in a 27C16 EPROM. Power consumption was 0.24ma for the computer, plus 20ma when the LED was on. The batteries lasted for the entire 2 days of the show (and they were used to begin with). Low power consumption was one of the big reasons why the 1802 was used in spacecraft.
Herb Johnson was so impressed that he built a web page to illustrate the construction of this model. (Thank you very much indeed, Herb!) It has lots more photos, links to the program that sends the data, and much more information.
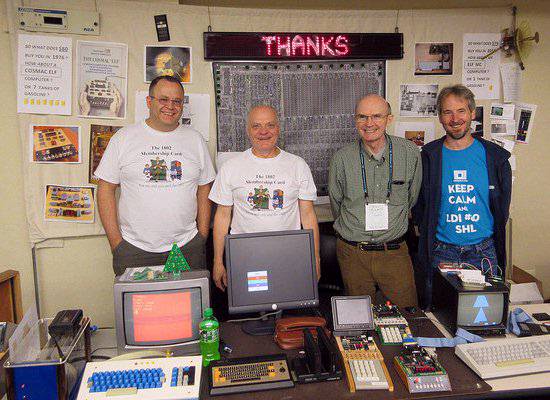
Interest in vintage computers has led to a growth in Vintage Computer Shows, where people can see and show these amazing machines in operation. Members of the cosmacelf.com forum decided to have an 1802 booth at the Vintage Computer Festival Midwest in Chicago. It was a great opportunity to demonstrate the wide range of applications for the 1802; past, present, and future. We had so much fun that we've done it every year since 2014. Maybe we'll see you there THIS year?
We had examples of the earliest RCA development systems, ELF computers built from the Popular Electronics articles, commercial 1802 systems, and more! It was so much fun that we plan to do it again. Details on this year's VCF-MW are here. If you're in the area, stop by and say hello!
I helped man the booth, and brought along examples of the Membership Card, Nametag, Face Card, and other 1802 systems. It was a great chance to meet many owners face-to-face, exchange ideas, and come up with even more projects for this amazing little CPU.
The photo above shows our booth. That's Josh Bensadon, Lee Hart, Bill Rowe, and Dave Ruske (from left to right). A BIG thank-you to Dave, Bill, and especially Josh for working so hard to pull this all together!
PS: Notice the T-shirts? We had them specially made for the show. :-)
The 1802 Membership Card Microcomputer, © 2006-2026 by Lee A. Hart. Created 8/5/2012. Last update 3/5/2026.
Go to TOP ........
Go to HOME ........
Questions? Comments? Email me for details.
Web hosting provided by my good friend and brilliant computerist Jon "Sheer" Pullen.